handmade for everyone on your list

At gleenashop, I am committed to carrying works made by fellow small-studio artists. So I decided to put together a hand-made gift bundle. All the items together are $100, which includes shipping, a wonderful gift to a special someone, or gifted individually to many on your list.

What is in the bundle:
• soap by Keats, made in Cleveland Heights
• porcelain peace bunny, made by gleena
• terrarium pencils by June&December, made in Detroit
• PF Candle incense, made in LA
• porcelain heart by gleena
• LoveWild lavender bath salts, made in Brooklyn, NY
• handkerchief by Bittle & Burley made in Brooklyn, NY
• roundie bowl by gleena

This bundle can be shipped anywhere in the lower US. Or stop into the shop, it smells wonderful full of evergreens! Open Tuesday-Friday noon to 6, Saturday noon to 5pm. Located at 2114 S. Taylor Rd. Cleveland Heights, OH.

or email info (at) gleena.com for more info.


forming and finishing the edge of each gleena piece

first, the edge is trimmed with a surform.
second, the edge is smoothed with a sponge
this hand process is repeated on every piece, creating its unique personality.

day’s work: mixing porcelain slip

There are five ingredients in my porcelain slip: English porcelain, kaolin, feldspar, silica, and frit. The combination of the five yields a very smooth, ivory finish when fired to a high temperature (2300F). I mix 20 gallons of slip at a time, wrangling 50lb bags of clay. A good workout resulting in great arms!

My mixer is a very low-tech set up: a powerful motorized blade on top of a garbage can. It works perfectly.

One scoop at a time of dry material is added to a vortex of water and Darvan 7 (a suspension agent):

The mixture starts out lumpy:

and then gets ice-cream-smooth in a few hours:

The slip will thicken up over the next few days as clay particles absorb the water. A proper thickness is necessary for easy pouring and smooth casting. To thin out the thickened mixture, I add a 50/50 of water/Darvan 7 to get the correct consistency. After 10 years of mixing, I still learn something new about slip every time I mix a new batch. It's a finicky material to work with.

transferware


Imagery has been a part of ceramics for centuries. There are many ways of applying an image to a ceramic surface, and “transferware” is a particular style of decorative ceramics.


Transferware is created by transferring a printed image onto the surface either under or over a glaze. This transfer technique, the predecessor to a more modern technique I use on gleena, was developed in England in the mid-18th century, particularly around the Staffordshire region.

The process starts with an engraved copper plate similar to those used for making paper engravings. The plate is used to print the pattern on tissue paper, then the tissue paper transfers the wet ink to the ceramic surface. The ceramic is then fired in a low temperature kiln to fix the pattern. This can be done over or under the glaze. The process produces fine lines similar to the engraved prints in old books. Before transfer printing ceramics were hand painted, a laborious and costly process. You can find more information, and sample patterns, on the Transferware Collector's Club website.

I love the backs of the plates, shown below with the mark of the maker, just as much as the fronts, if not more. This is where graphic design has met ceramics over the centuries.


lil BUB wees, the making of...

This is a story of how the Lil BUB wee teas were made. It was Lil Bub’s third birthday on June 21st, and as a gift, a limited edition of wee teas were created with all proceeds going to charity. We raised over $6000 for Lil BUB’s Big Fund for the ASPCA, it sure felt good to contribute to the aid of animals with special needs. Here is the making process:
after the cups are hand-poured and popped out of a mold, each is stamped with a vintage letterpress Caslon 540 letter.
the edge is smoothed out with a sponge, so it is nice and round and feels good when you are drinking from it. any excess porcelain bits are reclaimed and used in the next batch. we mix our own porcelain slip (liquid clay) in the studio.
after the cups are completely dry, they are fired to 1948 degrees F, this firing is called a bisque.

as an aside, you might ask "why do we bisque?" porcelain is notorious for cracking, and a bisque makes it stronger, therefore easier to handle while glazing. there are clays that don't necessarily need this step. heath ceramics, for example, has developed a strong clay body that can be glazed without the bisque.
the bisque cup is then coated with wax on the bottom, to prevent the glaze from seeping in. the bottoms cannot have glaze on them, or they will stick to the kiln shelf once they are glaze-fired.
the wax has to dry out for a few hours before glazing can proceed.
while the wax is drying, the next batch of wees is already on deck to be bisqued.
glazing step one: the ivory glaze is poured into the bisque cup.
the glaze is swirled around, and then poured out. any spills over the edge are wiped off with a sponge, the excess glaze is reclaimed. we mix our own glazes, too.
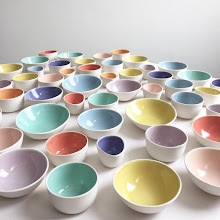
glazing step two: once the inside is dry, the cups are dipped into the color glaze. you can see where the glaze rolled off the waxed part. the cups are left to dry overnight, and in the morning loaded into the glaze firing. the cups are fired to over 2300F, called a high-fire, which works well with porcelain.
after the glaze firing, the image and typography are applied. the image is printed in-studio onto a piece of film, and then transferred to the cup. each piece of image has to be smoothed out to eliminate air bubbles.
the transfers are left to dry overnight to ensure proper adhesion to the cup.
the image firing is taken up to 2100F. since the bottoms are placed directly on the kiln shelf, sometimes parts of the transfer stick to the shelf. i am ok with that, it gives the logo a unique vintage look.

transferware is a very old form of decorated ceramic, see more images of it here. we just take the modern approach and use a laser printer instead of a copper plate to print the image.
the bottom of each cup is sanded with fine sandpaper for an amazing feel, and individually wrapped for safe transit.
double corrugated packing is used to make sure the cups arrive safely. we don’t like to use styrofoam peanuts, and so far the flexible, recycled corrugated has worked great for cushioning.
designing the packaging was an extra treat, graphic design was my first career, and package design is my favorite.
it took three trips to transport the packed and labeled boxes to the post office. all were shipped via Priority Mail, and so far have safely arrived. whew! good job post office!

and good job BUB fans, i am so grateful for all your kind notes.

and thank you BUB and DUDE (who happens to be my brother). so fun to have family one can do meaningful projects with. it has been an incredible experience all around.

transferware, the modern version

Many customers ask me how I get the images onto my pieces. It is a process I learned at RISD, thanks to Jacqueline Rice, one of my ceramics professors.

Here is my transfer process: There exists a laser printer cartridge containing a colorant that is commonly used in glaze recipes, and it fits into a high-end laser printer. Special paper is fed through the printer. A very high-resolution image is printed on the surface. The images I work with I find in old books of engravings from the 1400-1800’s, and have been carefully worked on to produce detail and sharp lines. The materials involved are costly, but the results are worth the price.

When the paper gets wet, a film with the image floats off, similar to a fake tattoo. I apply this film to the surface of a glazed piece.

I then fire the piece one more time, a third firing (the previous two being a bisque and a glaze fire). During the firing the film burns off, the image melts into the glaze, and turns a sepia color, which works well with the glaze colors I use. Because the image has melted into the glaze, it is permanent and food safe. Voila!

It is not as easy as it sounds. It took me a while to find a glaze that would behave well in a third firing and not totally dissolve the transfer image. Still, I get glitches. Like mysterious bubbles on some items, while the rest in the same kiln are perfect. Still learning ...

succulent love

The Midwestern Succulent and Cactus Society holds a sale every year at the Cleveland Botanical Garden. I scored some beauties, and quickly planted them up in gleena for the shop.
All cuttings, leaves for propagating, and extra re-plants reside, and rest, in the “research and development” planter until a gleena porcelain pot is available.
A few of the lovelies are now available at 2114 S. Taylor.

new in the shop

I have been expanding the double dipped line. I love overlapping two glazes, and seeing what happens at the intersection. Every time, it is a surprise, each piece unique, like a painting.
Nature inspired letter-pressed cards by Heartswell are a perfect compliment to gleena and the selection of air plants I now carry.
Wall hangings are a new direction to explore for me, this hearts garland was a big hit for Valentine's Day. I find it is also a good baby, wedding shower, and a Mother's Day gift.
My studio is part of the shop, and my apron is usually coated with porcelain as I work on making gleena daily. photo by Kris Craig
While winter turns the world blue outside, it is warm and cozy in the shop. Come visit!